Pushing Recordings to Amazon S3 Buckets or Compatible Services
The Pipe Platform can push the resulting files (MP4 file, original recording, snapshot, and filmstrip) to your Amazon S3 bucket or other S3-compatible services for storage and delivery.
Our push to S3 mechanism supports all standard AWS regions, custom endpoints, canned ACLs, folders, storage classes, cross AWS account pushes, multipart uploads, and URLs.
S3 bucket names
We validate bucket names used in the Pipe Platform against the official Amazon S3 bucket naming rules. Dots are allowed in bucket names. Even though your S3-compatible storage provider might have other naming rules, we must enforce the official AWS rules because we use the official AWS SDKs.
Multipart uploads
Recordings larger than 100MiB are pushed to Amazon S3 or compatible services using multipart upload.
- This method ensures improved throughput (faster uploads), especially when the S3 bucket is far away from our transcoding servers (when pushing from our EU2 region to an Amazon S3 bucket in Mumbai, for example).
- Multipart upload is the only way to push files larger than 5GiB to Amazon S3.
- On choppy connections, only parts that failed to upload will be retried (up to 3 times) instead of retrying the entire file. This should translate into faster uploads.
With Amazon S3, for multipart uploads to work, your IAM user needs to have the s3:AbortMultipartUpload action allowed through the attached policy.
Object URLs
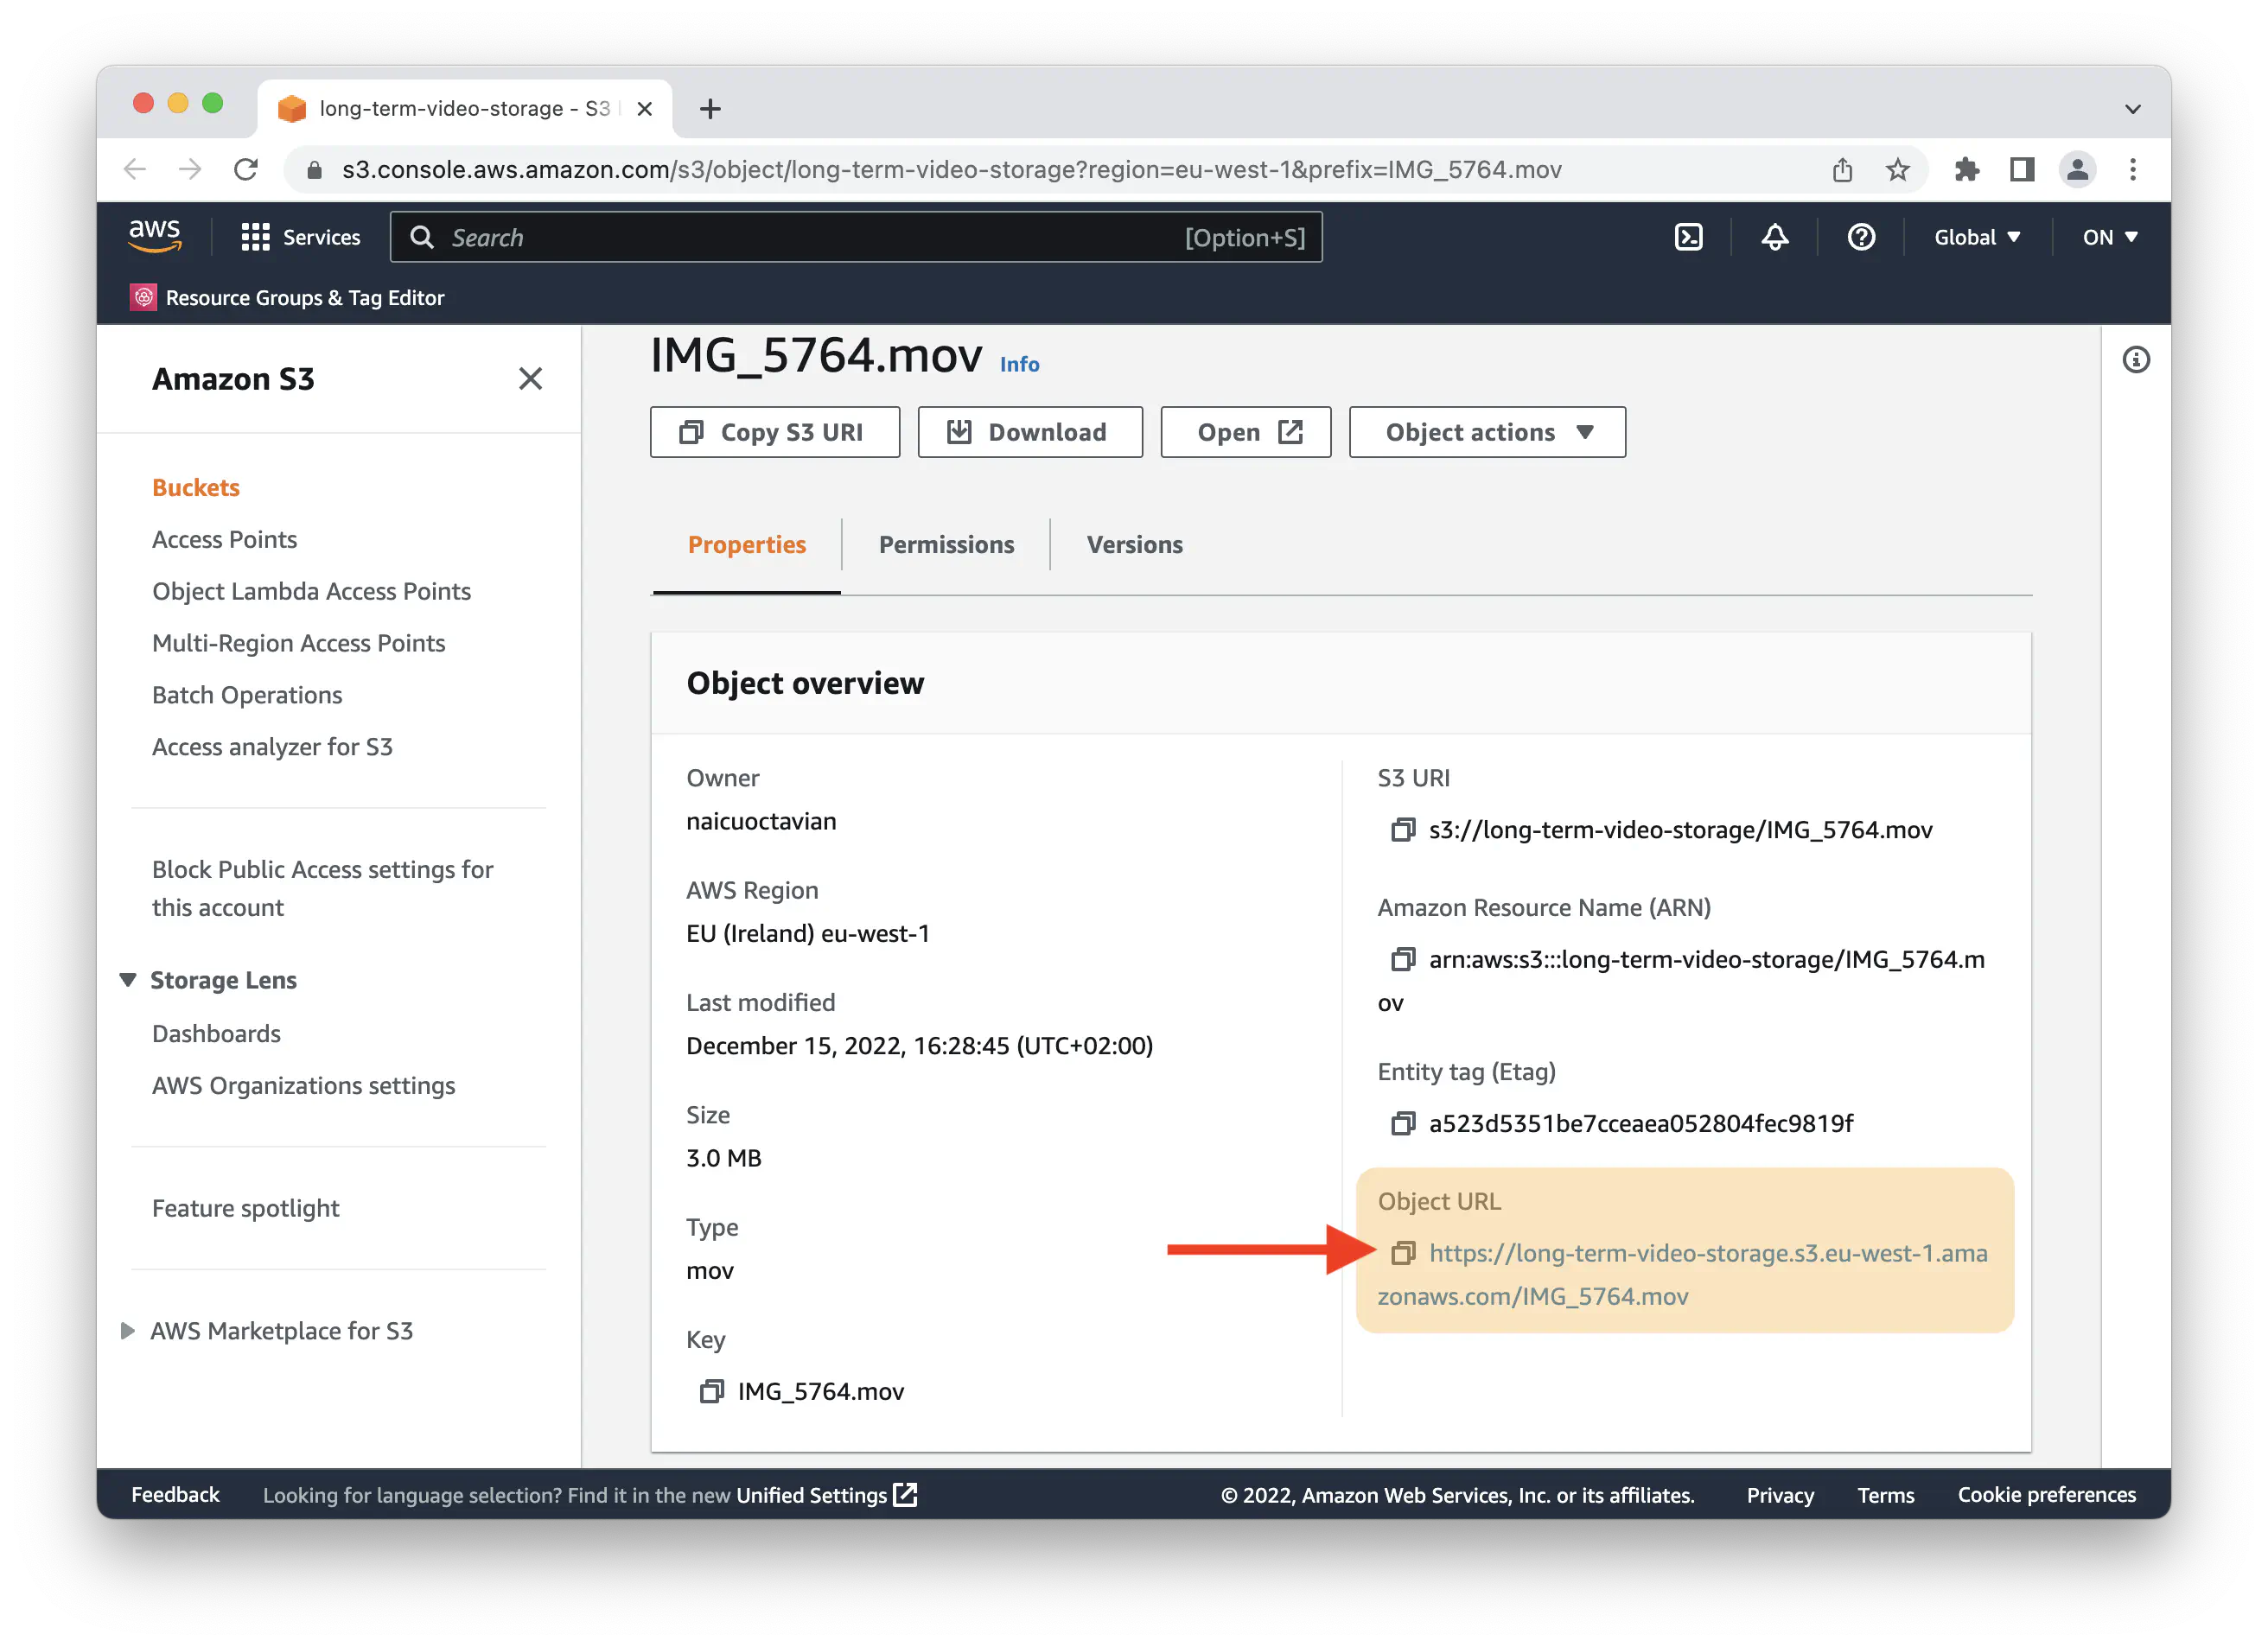
When we push a file to your S3 storage, the storage service should generate a https link (named Object URL) for the file. This link will be shown in the Pipe account dashboard’s s3_logs page and will be pushed to you through the video_copied_s3 webhook. With Amazon S3, this link is named Object URL and is available in the AWS Management Console for every file hosted on your S3 bucket.

Whether or not the object or file is publicly accessible directly through the link is governed by various controls. With Amazon S3 you have the following:
- For buckets with ACL enabled: ACL permissions are active on the file (initially set through the ACL setting in the Pipe account dashboard’s S3 credentials section) and Block public access bucket settings regarding ACL permissions.
- for buckets with ACL disabled: the bucket policy and Block public access bucket settings regarding bucket policies
The blog post named Amazon S3 Object URLs contains more info on the topic.
Pushing to Amazon S3 Buckets
You’ll need an AWS account, an S3 bucket, and an IAM user with the correct permissions and security credentials. We will cover these below.
In the end, you’ll have to provide the following information in the Pipe account dashboard:
- Access Key ID for the IAM user
- Secret Access Key for the IAM user
- Bucket name
- Bucket region (or custom endpoint)
You’ll also be able to configure the following:
- the folder in the bucket where to put the files
- the type of canned ACL
- storage class
Basic setup
The four steps below will guide you through setting up the Pipe Platform, IAM user, and the S3 bucket so that the files will be publicly accessible through private links. As a result, any person (or system) with the links will be able to access, play, or download the files, straight from the Amazon S3 bucket, without authenticating. This setup will be achieved using ACLs, but you can also do it using bucket policies.
The Object Ownership and Block all public access settings at the bucket level and canned ACL option chosen in the Pipe Platform are strongly linked and govern whether or not the files will be publicly accessible through private links/URLs.
Step 1: Create an AWS account
You can sign up for an AWS account at https://aws.amazon.com/free/. There’s a Free Tier that includes 5GB of standard S3 storage for 12 months. This guide from AWS covers in detail how to create a free account.
Step 2: Create an Amazon S3 bucket
With the AWS account created, you now need an S3 bucket so let’s make one:
- While signed in to the AWS Management Console, go to the Amazon S3 section.
- Click the [Create Bucket] button at the top right.
- Give the new bucket a name (you must respect the bucket naming rules).
- Select a region (newer regions are not enabled by default)
- For Object Ownership, select ACLs enabled. The secondary option between Bucket owner preferred and Object writer is not important for this guide.
- Uncheck Block all public access and make sure all four suboptions are unchecked.
- Now click [Create Bucket] at the bottom.
Step 3: Create an IAM user, get the access key & secret
To create an IAM user:
- While signed in to the AWS Management Console, go to the Identity and Access Management section.
- On the left side menu, under Access Management, click on Users, and in the new section, click on [Add Users].
- Give the new user a name and click [Next].
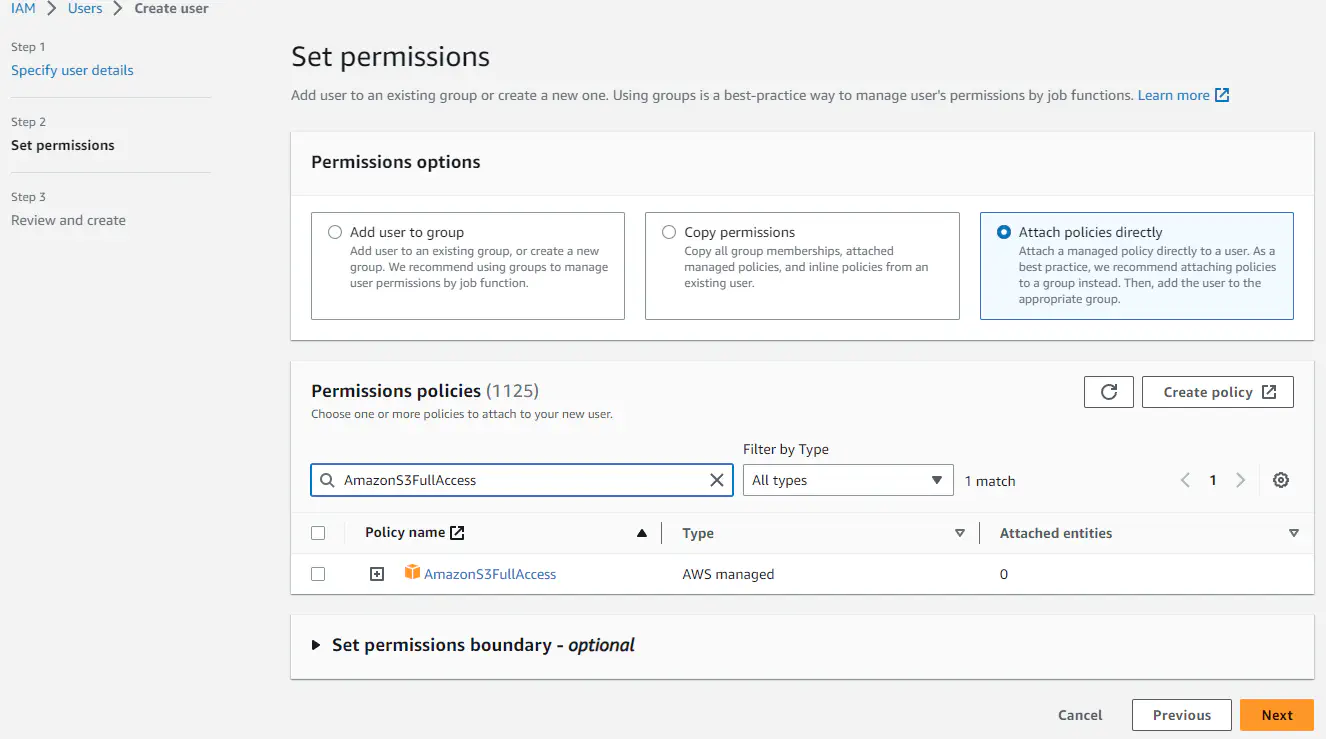
- Under Set permissions, click on Attach existing policies directly; search for and check the AmazonS3FullAccess policy, then click on [Next].

- Under Review and create, click on [Create user].
- Your user will be created and will be listed on the IAM users page.
- Click on the user and will be taken to a new page where you will be able to create security credentials for programmatic access.
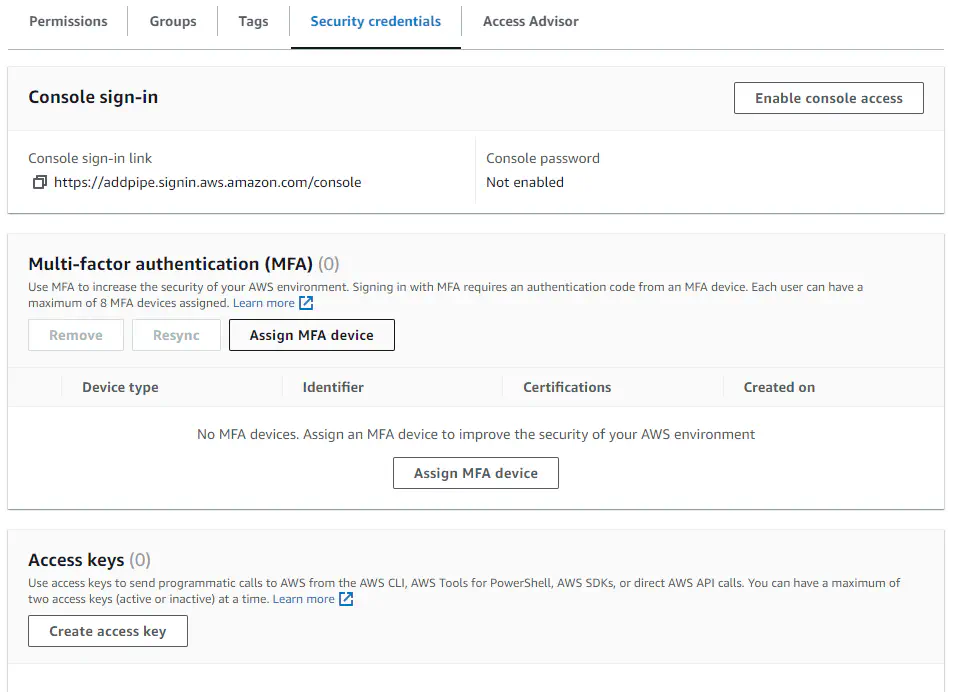
- Click on the [Security credentials] tab.
- Scroll down to the [Access keys] panel; click on [Create access key].

- You will be taken to a new page Access key best practices & alternatives. Here select the option Application running outside AWS and then click [Next].
- You can skip the Set description tag section so click on [Create access key].
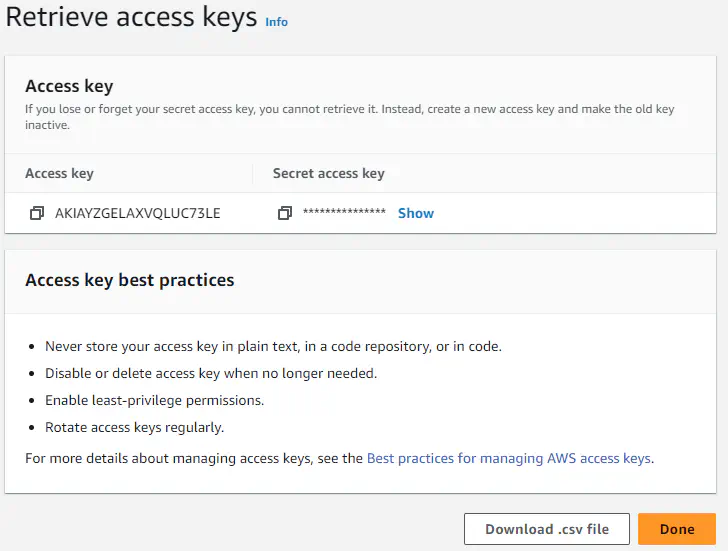
- Both the Access key ID and secret access key will be available on this page. Click on the show link under Secret access key to show your secret access key. Copy and paste it somewhere safe because it is the only time when the secret key can be viewed. The Access key ID, on the other hand, will be available after you leave this page. You can also download the credentials as a .csv file.

Step 4: Configure the Pipe Platform to push the files to your S3 bucket through your new IAM user
- Go to the S3 section in your Pipe account dashboard.
- Fill in the Access Key ID and Secret Access Key.
- Type in the bucket name and select the corresponding region.
- Type in a folder name or leave the folder value empty to have the files put in the bucket’s root. We also support subfolders.
- For Canned ACL, select Public-read. This choice will ensure the files will be publicly accessible through the private Object URLs generated by Amazon S3.
- Click [Save Amazon S3 Credentials].
At any time, you can manually remove your S3 credentials. The credentials are also deleted from our database when your account is manually or automatically deleted.
For each new recording, the Pipe Platform will now attempt to push the resulting files to your S3 bucket. What files are created and pushed depends on the outputs enabled in the Transcoding Engine section of the Pipe account dashboard.
The production servers, which will push the files to the Amazon S3 buckets, have the following IPs:
- 162.55.182.247 (EU2 region)
- 167.99.110.163 (US1 region, west)
- 68.183.96.15 (US2 region, east)
- 165.227.38.98 (CA1 region)
For a more secure setup, we recommend limiting your IAM user policy to our IPs. To do that, you can follow the steps from this tutorial.
Disabled AWS regions
Some AWS regions, like Europe (Milan), Asia Pacific (Hong Kong), and Middle East (Bahrain), are disabled by default in all AWS accounts. To enable them, follow this guide.
IAM users, policies & actions
If you’ve created a custom policy for your IAM user, you need to add the following actions to the policy:
s3:PutObjectfor the IAM user to have permission to upload the recording files.- If you have ACLs enabled on your bucket, some ACLs will require that the IAM user has the
s3:PutObjectAclaction as well. If this action is needed but missing, you will get a 403 Forbidden response from AWS, which will be visible in the S3 logs. s3:AbortMultipartUploadis needed in relation to multipart uploads.
For a more secure setup, the actions above need to be granted on the specific S3 bucket where you want the files uploaded.
For a quicker but less secure setup, the AmazonS3FullAccess IAM policy includes all needed actions, and the * resource or All resources option includes all possible S3 buckets.
The IAM user can belong to the same AWS account as the bucket, or it can be on a different account (cross-account pushes).
Bucket settings: Object Ownership
ACLs enabled
To push the files to a bucket with Object Ownership set to ACLs enabled, the canned ACL setting in the Pipe Platform can be set to any of the seven available options.
The chosen canned ACL and the Block public access bucket level setting will impact who (bucket owner, file owner, anyone on the Internet, etc.) has what permissions on the files. For the HTTP links/URLs generated by Amazon S3 for each file to be publicly accessible, choose public-read or public-read-write (these two canned ACLs differ only when applied to buckets, and we’re setting them on files pushed to your S3 bucket).
If you’re doing the push cross-account (the S3 bucket belongs to account A and the IAM user belongs to account B), then the S3 bucket needs to grant the Write permission to the canonical ID of account B in the Access control list section.
You can read more about ACLs and canned ACLs in the official ACL documentation.
ACLs disabled
For us to push the files to a bucket with Object Ownership set to ACLs disabled - which is the current default and recommended setting - the canned ACL setting in the Pipe Platform needs to be set to none or bucket-owner-full-control. private and bucket-owner-read will also work but only when the IAM user and the S3 bucket belong to the same AWS account.
If you’re doing the push cross-account (the S3 bucket belongs to account A and the IAM user belongs to account B), then the S3 bucket needs its own policy allowing the user from account B to write to it.
The bucket-level policy and Block public access settings will establish whether or not the HTTP links/URLs generated by Amazon S3 for each file will be publicly accessible.
You can read more about controlling ownership of objects and disabling ACLs for your bucket in the official Object Ownership documentation.
Canned ACLs
When using ACLs, you give up to 4 permissions (READ, WRITE, READ_ACP, WRITE_ACP) on S3 buckets and files to various grantees (the file owner, AWS groups, everyone on the Internet, other AWS accounts, etc.) in a similar way to how file permissions work on Linux.
More specifically, when using ACLs with files pushed by Pipe to your Amazon S3 storage, you give up to 3 permissions READ, READ_ACP & WRITE_ACP (WRITE is not supported by files, only by buckets) on the uploaded file to certain grantees (the file owner, the bucket owner, the AuthenticatedUsers group and the AllUsers group which means everyone on the Internet).
When Pipe pushes the recording files to your Amazon S3 bucket with ACLs enabled, it can use one of 6 canned (predefined) ACLs to set the permissions on each file. Here’s our description of each canned ACL:
Private
The default ACL. The file owner (root AWS account - regardless if the file was pushed through an IAM account or a root account - set up to push the file to your S3 bucket) gets FULL_CONTROL. For files, that means READ, READ_ACP, and WRITE_ACP permissions on the file. There is no WRITE permission available for files. No one else has access rights.
Public-read
The file owner gets READ, READ_ACP, and WRITE_ACP permissions on the file, just like with the private ACL above. The AllUsers group gets READ access, meaning anyone can access the file through the URL (link) generated by AWS. Select this option if you want the file to be publicly accessible to anyone with the link.
Public-read-write
For our purposes, this ACL has the same effect as Public-read. The extra WRITE permission that the AllUsers group gets through this canned ACL has no effect on files, only on buckets.
Authenticated-read
Similar to Public-read, but it is the AuthenticatedUsers group that gets READ access. This means that an authenticated GET request against the URI (link) generated by AWS will return the file/resource. For a request to be authenticated, you need to send the Authorization header value as part of the request. Postman makes it easy to generate such requests.
Bucket-owner-read
Useful when you’re using an AWS account to write files to an S3 bucket from a different AWS account. Object owner gets FULL_CONTROL. The bucket owner gets only READ access.
Bucket-owner-full-control
Useful when you’re using an AWS account to write files to an S3 bucket from a different AWS account. Both the object owner and the bucket owner get FULL_CONTROL over the object (meaning READ, READ_ACP, and WRITE_ACP permissions).
None The recommended option if the bucket has ACLs disabled. If the bucket has ACLs enabled, it will automatically default to the Private ACL.
You’ll find more information on ACLs and each canned ACL in the official ACL documentation from AWS.
Amazon S3 Storage Classes
Amazon S3 offers a range of storage classes designed for different use cases. You can read more about each storage class in the official Amazon S3 documentation:
Pushing to DigitalOcean Spaces
The subject of pushing the recording files to DigitalOcean Spaces has been covered in this tutorial.
Pushing to Google Cloud Storage
The subject of pushing the recording files to Google Cloud Storage has been covered in this tutorial.
S3 Logs
We keep a log for each attempt to push a group of recording files to your configured Amazon S3 bucket or compatible services. The logs are available for 30 days through https://dashboard.addpipe.com/s3_logs.
The logs table contains the following information:
| Recording ID | The ID of the recording whose files were pushed to your bucket. |
| Date & time | Date and time for when the log was saved to our database. |
| Details | The start of the key & secret; the bucket name, folder & region; the custom endpoint if any, canned ACL, and storage class. |
| Status | The status returned by AWS. |
| Exception | Any exception returned by AWS. |
| Object URLs | The links received from the S3 storage provider to the files hosted on your bucket. With Amazon S3, every file uploaded to an S3 bucket has an Object URL, while bucket policies and ACLs will govern the file’s (public) accessibility via the URL. |
The Status column can have one of these three values:
| OK | Upload of the main recording file (mp4 or raw recording) was successful. |
| FILE_MISSING | The local main recording file (mp4 or raw recording) on Pipe’s transcoding server is missing. |
| FAIL | This may be triggered for all the recording associated files by various errors, which should be displayed in the Exception column. |